How to tie a tie to ensure you always look your best
December 7, 2019

A tie will always make your outfit stand out. Whether it’s worn to work, some special occasion or a gala party, the way you tie your tie will always be the cherry on top.
Think about it like this, buying your tie wasn’t easy. You searched through many prints, fabrics, brands and prices, but in the end, you stick with what you think works best for your image. If you’ve already invested your time and money, it’s best to know what kind of knot suits you the best.
Most men know and use only one or two different tie knots, usually the fastest and most simple. But if it’s elegance, class and wanting to stand out you want, we’ll show you some more ways to tie it to give you and your image the class you deserve.
Mr Jeff, the best care for your ties
Before you start, remember that your tie, like any other garment, needs to be taken care to keep it looking as good as new. Tie fabrics are usually delicate and need special treatment, so we recommend leaving your ties to the professionals to wash and iron, so as not to ruin them.
For that, you can count on the service offered by Mr Jeff. Include your ties in your order so you will always have them clean and ready for the red carpet!
Since you’re here to learn how to tie your tie, we want to give you the gift of a having your suit cleaned so that you’ll have that flawless combination.
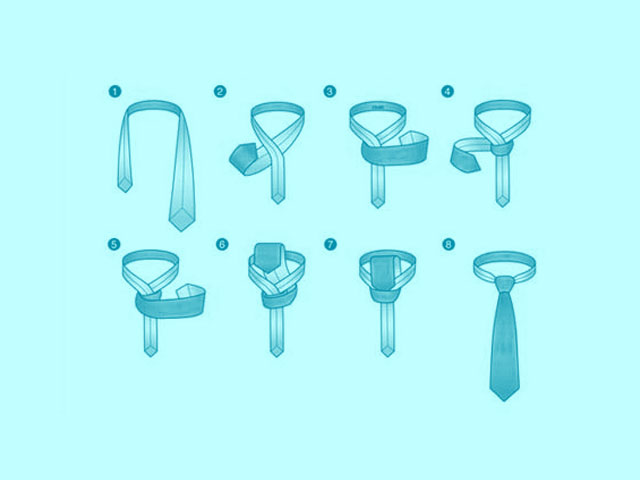
How to tie a four-in-hand knot
Name: Four-in-hand
You may not have known that this is the original name of the knot you most probably use. The name is taken from an old 19th-century London Gentlemen’s Club that had the same name.
It consists of 7 simple steps:
- Put the tie around your neck with the front design facing out, as shown in the image. Make sure that the wider end is longer than the thinner one. There is no exact length required, that depends on the length of the tie and your height. Trial and error!
- Cross the wide part of the tie over the thin part.
- Now bring the wide part back over the thin part.
- Pass the wide end over the thinnest end (circling).
- Take the wide tip and bring it up so that it passes between the neck.
- Take the tip and put it inside the loop that formed when passed over.
- Take the tip and pull it down to tighten the knot, and voila!
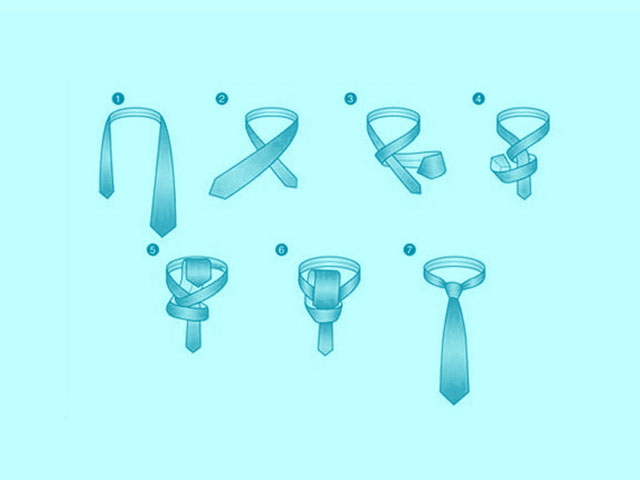
How to tie the four-in-hand.
How to tie a Half Windsor knot
Name: Half Windsor
You may or may not be familiar with this. The name of this knot comes from the original Windsor Knot (which wasn’t invented by the Duke of Windsor as one may believe). It’s called the Half Knot because it simplifies the original 11 steps of the Windsor’s knot to 8.
- Put the tie around your neck with the front design facing out, as shown in the image. Make sure that the wider end is longer than the thinner one. There is no exact length required, that depends on the length of the tie and your height. Again, trial and error!
- Cross the wide part of the tie over the thin part.
- Now bring the wide part back over the thin part.
- Bring the wide tip up and pass it inside the neck by pulling in the opposite direction.
- Take the wide tip and pass it over the thin part (surrounding it), but it will now be to the opposite side.
- Pass the tip inside the neck but this time from the back, from the bottom up.
- Put the tip in the loop that was created by pulling it down.
- Finally, take the tip and pull down to tighten the knot.
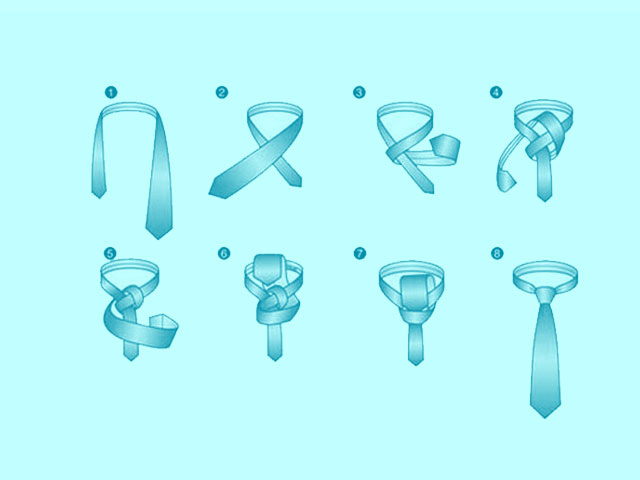
How to tie the Half Windsor
How to tie a Full Windsor knot
Name: Full Windsor/Windsor
This is the original knot which got its fame and name from the Duke of Windsor. Although many say he didn’t use this knot as he used hand-knotted knot, he achieved a robust, elegant style when he made them with wide ties which were confused with the Windsor Knot.
- Put the tie around your neck with the front design facing out, as shown in the image. Make sure that the wider end is longer than the thinner one. There is no exact length required, that depends on the length of the tie and your height. Once again, trial and error!
- Cross the wide part of the tie over the thin part.
- Take the tip and put it up behind and through the neck.
- Lower the tip again in the same direction from where you took it.
- Pass the tip behind the body of the tie as if you were going to surround it.
- Now bring the tip up to pass it in front and in from the neck.
- Lower the tip again to the same direction from where you took it.
- Pass the wide tip of the tie over the body of the tie to surround it.
- Once surrounded, take the tip back up to pass it inside the neck.
- Put the tip in the loop that has been formed.
- Finally, take the tip and pull down to tighten the knot.
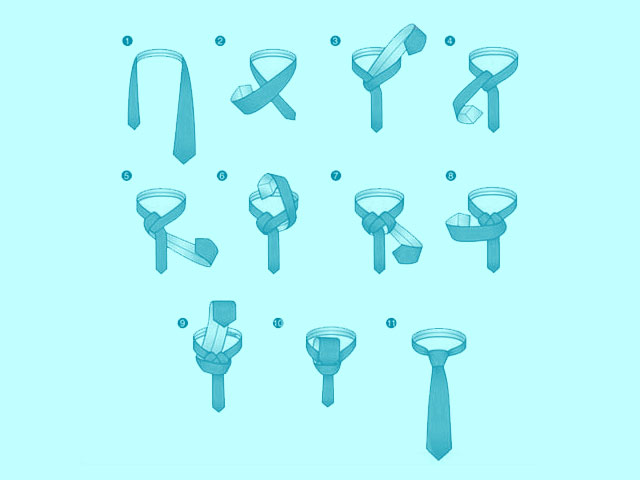
How to tie the full Windsor
This know goes very well with wide necks as the end result is very firm and symmetrical with an aesthetic triangular finish.
How to tie an Oriental knot
Name: Oriental/Simple knot
This is an easy one as it requires the least amount of steps! It’s very popular in China and has a stylish asymmetry that gives it a unique touch as it goes a little to the side when tightened.
- Put the tie around your neck with the front design facing out, as shown in the image. Make sure that the wider end is longer than the thinner one. There is no exact length required, that depends on the length of the tie and your height.
- Pass the wide part over the thin part from behind.
- Turn it forward to surround the long part.
- Raise the wide tip, passing it inside the neck.
- Put the tip down through the loop that has been formed.
- Take the tip and pull down to tighten the knot.
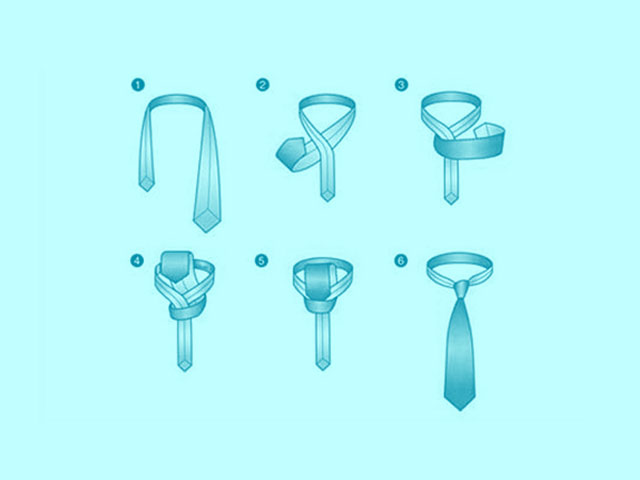
How to tie the Oriental knot
Simple, fast, elegant, it has everything. This knot is ideal for tall people as it consists of few turns and the garment isn’t shortened too much. It’s recommended for thick ties as there will be no ostentatious knot.
How to tie a Kelvin knot
Name: Kelvin
Similar to the four-in-hand but firmer. The name was given in honor and reference to Lord Kelvin (William Thomson, 1824-1907), who played an important role in the study of atomic knot theory.
- Put the tie around your neck with the front out, as shown in the image. Make sure that the wider end is longer than the thinner one. There is no exact length required, that depends on the length of the tie and your height.
- Pass the wide part over the thin part from behind.
- Turn it forward to circle the long part so that it’s tight.
- Turn again to circle a second time, but this time without squeezing so much.
- Bring the wide tip through the inside of the neck.
- Put the tip in the loop that was formed between the first and second turn.
- Take the tip and pull down to tighten the knot.
- Adjust and done!
How to tie a Kelvin knot
The result will be slightly larger than the four-in-hand but more firm and angular.
How to tie a bowtie
Name: Bowtie
This garment has made a comeback in recent years, but its use will always make a formal or casual style stand out.
- Put the tie around your neck with the print side facing inwards and make sure the ends are the same length.
- Take one end and fold it in a way that makes the shape of a bow.
- Now take the other end and pass it in half and over the end you have folded in the previous step from the bottom up.
- Turn it inside the neck to fasten.
- Take the latter end and fold it to give it the shape of a bow.
- Put this last folded end between the knot that holds the piece in half.
- Adjust the ends to style and get the appropriate shape and support.
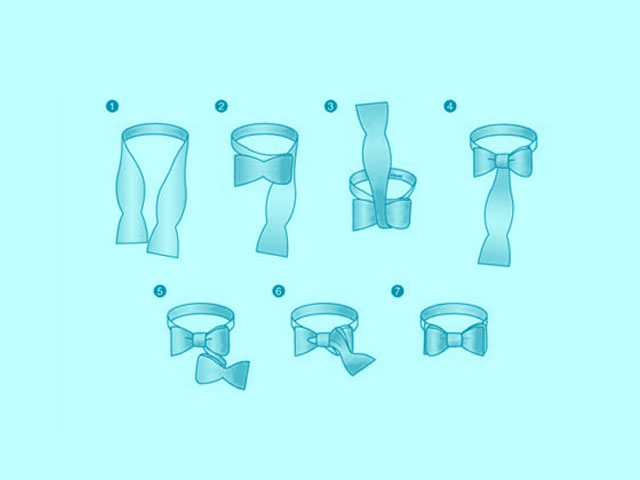
How to tie a bowtie knot
These are just some simple, classic and elegant styles to make your outfit stand out. There are many more ways to tie your tie, but we decided not to focus on the more practical ones!
Remember to keep your ties looking brand new with Mr Jeff’s dry cleaning service. Add all your favorite ties and have them clean, smooth and ready to wear.
You could be interested in:
If you like our post How to remove resins from clothes ¡rate it!